

How To Build A Web Application to Discuss It In Your Job Interview
Your last project is one of the primary focuses of your interview. By creating a solid project, you can increase your chances of getting hired.


Table of contents
- Step 1: Come up with an idea
- Step 2: Prepare a list of high-level steps you will need to take to start & complete this project
- Step 3: Now, break your project idea into smaller feature sets
- Step 4: Design application flow, wireframe, and mockups
- Step 5: Select technology stack
- Step 6: Setup GitHub repository & Local dev env
- Step 7: It’s finally time to code
- Step 8: Deploy application to a hosting
- Step 9: Fine tune and add it to your resume & portfolio pages

I am going to explain to you the steps for starting a new open-source project.
The steps include coming up with an idea, dissecting your project idea into detailed requirements, listing all the steps, and working on it. By following these steps, you can make faster progress and evolve your initial one line idea into detail project requirements.
You will also be able to identify steps you will need to take from start to finish to build this project.
The goal of this project is to build a web application you can discuss during your job interviews.
It will allow you to show your hiring manager how you think and work. By talking about this project, you can show your thought process, steps and how you make decisions.
By sharing a holistic story about your project, you will earn their trust and possibly a job.
Unfortunately, most web developers don’t go through this process and focus only on the programming aspect of a project.
Don’t worry. I will explain how you overcome this issue.
Here’s how, step by step:
Step 1: Come up with an idea
Your initial idea is important because that’s what you will convert into a project.
The best ideas are ones you can relate to and something you have an opinion about.
For example, a web application you frequently use, such as a job board, budgeting app, virtual trade shows, recipe database, task manager app, Pomodoro timer, weather forecast application etc.
You can also pick one of the classic projects, such as a library management application, IT inventory management application, Todo list, online quiz app, and build it better.
You can also search for open-source projects and begin with their initial release. I recommend Eddiehub, where you can find the first edition of his open-source projects. Thanks to Arya for this suggestion.
One of the projects I always wanted to build was a better version of Goodread website. I use it regularly, and I don’t know why no one has done it yet.
Step 2: Prepare a list of high-level steps you will need to take to start & complete this project
Most web developers would jump right into the coding, which is wrong approach.
To create a web application, you have to go through many steps, such as
Make a list of features
Design application flow, wireframe, mockups
Select technology stack, languages, libraries, frameworks, and tools you will use to build this application.
Set up Github (or other Git) repository
Set up your local development environment
Code of various screens
Create database and code backend
Test and fix bugs
Deploy application on a hosting
Add a write up for your resume and LinkedIn
High-level steps will give you an end-to-end perspective on this application so that you are not just focusing on a few technical & programming steps.
Step 3: Now, break your project idea into smaller feature sets
You can use work breakdown approach to expand your original idea into feature sets and areas of work
There are two ways to do it.
You can break the work into various phases, such as requirements, design, coding, testing, deployment, etc. This is a conventional way of work breakdown.
Alternatively, you can break the work into smaller sub-set of features. Following is an example of how we broke Testimonial project.

Image created by the author using Lucid App.
Again, most web developers would start coding rather than plan a project in this fashion. They are too quick to jump into coding. Always remember, planning is 70% of the project, and coding is only 30%.
Step 4: Design application flow, wireframe, and mockups
Next, let’s design the application flow.
At a high level, each web application has a login flow, homepage, and flow for each feature. It will help you significantly if you create a high-level flow of your application similar to following.
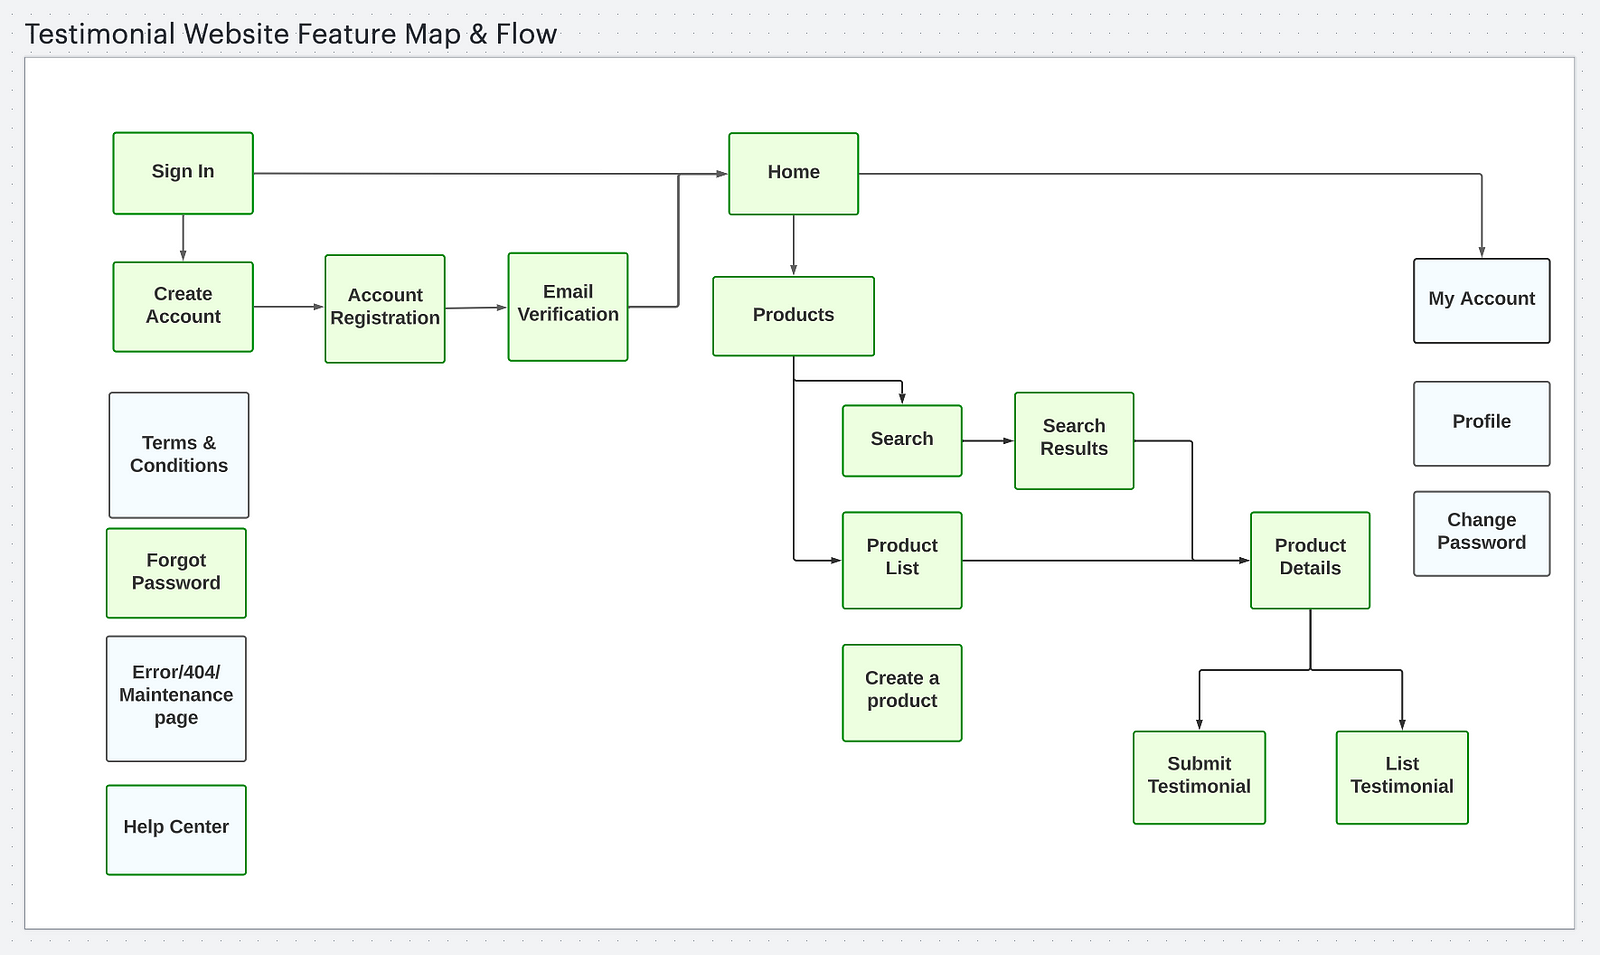
Image created by the author using Lucid App.
The next step is to create a wireframe for each of these boxes.
Wireframes typically show the placement of labels, images, buttons, and other elements. It helps visualize functionality before moving on to a more detailed design (mockup).

Image created by the author using pen & paper.
Finally, create a mockup.
If you are a team of one, you could skip creating mockups. But remember, while building a web application, you still need to decide image, font size, colors etc. A mockup lets you define those granular details and keep your coding time for logic and programming.
Step 5: Select technology stack
Next, you will have to pick technology stacks such as libraries, frameworks, and tools to build this application.
While there are 100s of choices, I suggest picking simple technologies and focus more on the building process. You can always create a version 2.0 with more sophisticated technology.
Here is my suggestion for you to build your project.
Foundation: HTML, CSS, JavaScript
Library & Framework: React, NestJS
Database: MongoDB
Tools: GitHub, VS Code
Step 6: Setup GitHub repository & Local dev env
Before you can start writing your code, there are a few more things.
Create a new GitHub account or use an existing account to create a repository for your project. Then clone this repository on your laptop so that you can start writing code and commit.
GitHub is one of the most popular online source control systems.
Here are the detailed instructions to set up your GitHub repository.
Set up Git - GitHub Docs
*To use Git on the command line, you will need to download, install, and configure Git on your computer. You can also…*docs.github.com
Step 7: It’s finally time to code
You must be excused by now. But there are a few more steps.
A good programmer always creates an outline of the program before writing the first line of the code. Such outlines are called pseudocode. Pseudocode with a flowchart and sequence diagram could provide you a robust jumpstart for your code.
You can write your code effectively using these steps.
Coding typically involves frontend, backend, and database code.
Step 8: Deploy application to a hosting
You will need hosting place to deploy your application so that you can show it to recruiters and your hiring managers.
One such option is Netlify.
You can create a free account, connect your GitHub repository, build and publish to Netlify in minutes. That’s it! Once deployed, you can start sharing it with the world.
Step 9: Fine tune and add it to your resume & portfolio pages
At this stage, you want to fine tune your application.
Update the heading, sub-heading and copy. You want it to look professional. Also, do a few rounds of testing and fix anything that you find. You can also ask your friends and family to try the application and provide you feedback.
Update your resume, portfolio and social profile.
Add the application description and URL to your resume, portfolio, LinkedIn, and Twitter profile. You want to make sure recruiters and hiring managers will notice this application.
That’s a wrap.
Now, it’s your turn to pick and idea and build your web application. I would live to know which application you decide to make. If you need any help, please let me know, and I will always be here top help uyou out.
As always, I would love to hear from you.
So write a quick one-line comment with a few encouraging words. It will mean a lot to me. You can also DM me on 👉 Twitter @VinodSharma10x.
If you like this article, then you will love my free offerings.
📪 Career Jumpstart Newsletter for web developers with one actionable tip every week
🎓 Career Jumpstart Email Course for web developers to 🎨 craft your dreams
📔 Career Jumpstart Workbook for web developers to achieve your dreams one quarter at a time.
Use them to start your 2023 with a blast ⚡🚀.
Disclaimer: Some of the links in this post are affiliate links, meaning, at no additional cost to you, I will earn a commission if you choose to make a purchase. I am very grateful for your support of this site in this way. Thank you.